MacDCC Command Station
Using Arduino microcontrollers to send and monitor dcc signals
Jan 2015
Over the last few weeks I have been building an Arduino and Mac based DCC command station and today it all successfully came together with the running of my first locomotive under DCC control!
The Arduino software is quite simple, just receiving raw bytes from my Mac in a very simple format, which is then converted to DCC and sent out to a booster. The format is just a byte specifying how many further bytes are in the message, followed by the actual DCC bytes including checksum. After the required number of bytes have been received by the Arduino, the message is validated using the checksum, then replaces the oldest of the current two messages being sent. The Arduino software continuously sends out the last two commands that it receives so that no message is sent twice in a row. It is only a slight modification of the code mentioned in this post.
The Mac side is a bit more complicated and no where near complete. However, it basically consists of a dispatcher which contains 2 queues of differing priorities, high and low. A message from a button or slider is put into either the high or low priority queue depending whether it is a loco message (mainly speed and emergency stop I think) or not. Meanwhile, the dispatcher sends messages out of the serial port to the Arduino, sending a few from the high priority queue in a round robin fashion and then one from the low priority queue, then back to the high priority queue, and so on. When a message has been sent a number times from the high priority queue it is removed from that queue and placed into the low priority queue and after it has been sent from the low priority queue a few times it is removed from the dispatcher. The stimulus to send another message comes from an acknowledgement from the Arduino that a message has been received. There is no error checking yet but so far it works well.
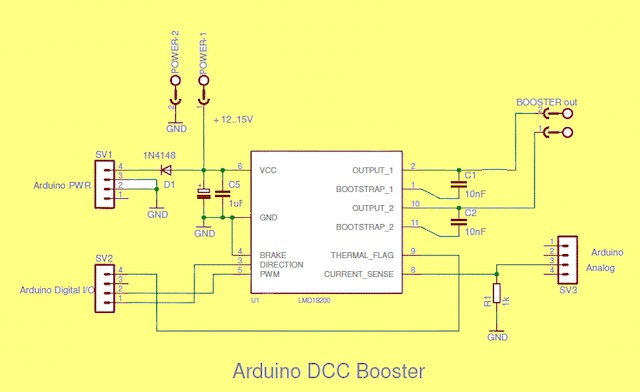
A previous post mentioned that I have been testing all this using two Arduinos hooked directly together without any of the booster hardware required to actually run a layout. This makes it much easier to debug the software side of things. However once I got the software up and running it was time to concentrate on the hardware. I first built the hardware side of the MynaBay DCC monitor (UPDATE: This link is broken - see below) on a breadboard and hooked the transmitting Arduino directly to it (i.e. no booster). Luckily, things still worked, so it was time to build the booster. I built the one shown below, leaving out the thermal flag, overload and the filter (so basically just 4 caps and the LMD18200). Before I hooked up the output of the booster to the input of the Arduino monitor I ran a very basic blink type program on the ‘Command’ Arduino to make the input to the booster go very slowly high and low and checked the booster outputs with a multimeter. Sure enough, the outputs swung from approximately +14V to -14V in response. Next step was to hook the output of the booster to the input of the monitor hardware and reload the Arduino command software. Still working. Finally…. I wired up a short section of track to the booster and ran my first loco under DCC control!
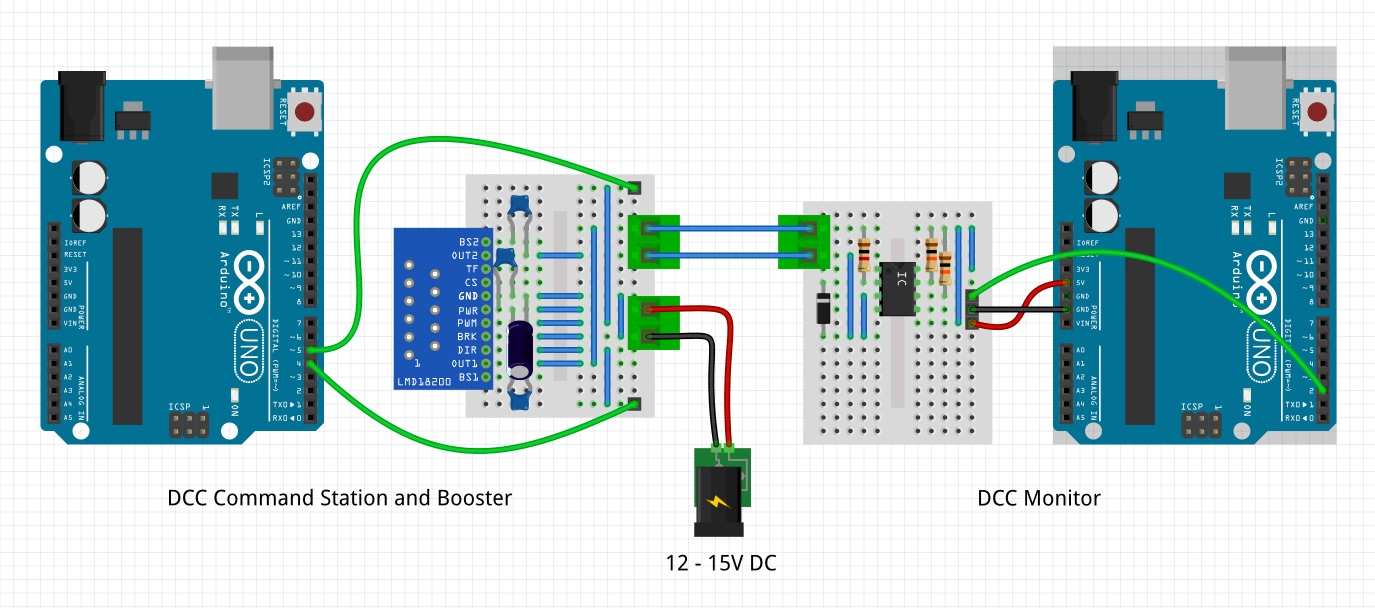
I only had a couple of problems that had to be sorted out. The 11 legs of the LMD18200 have a non standard spacing so they won’t fit into a proto-board so I ended up soldering a wire to each leg. Apparently the LMD is also static sensitive, which I only found out after I’d handled it quite a bit. Still worked though. The Arduino transmitter was also self powered rather than via the same power supply as the booster in the diagram so I had to add a ground wire from the Arduino to the booster.
Here is a schematic of the LMD18200 booster - taken from now defunct OScale.net website. Similar LMD18200 based modules are available by Googling.
Unfortunately I don’t have a schematic for the MynaBay DCC decoder but is is a very simple circuit using an opto-coupler. There a many of these available with a search.
Here is a picture of the setup. Note that I just wired up the LMD18200 directly to the prototyping board rather than use the breakout board as shown here.
In a couple of days I will add the Arduino transmitter code ( modified from O-scale ), the booster testing ‘blink’ program and the MacDCC command station software to my download page.


